
How to Disconnect Car Battery: The car battery is the silent heart of your vehicle’s electrical system. While it’s built to last for years, there are numerous situations where knowing how to disconnect it is an invaluable skill for any car owner. Whether you’re performing routine maintenance, installing new accessories, storing your vehicle for the winter, or dealing with an emergency, doing this task correctly is paramount. A simple mistake can lead to fried electronics, sparks, or even injury.
This comprehensive guide will walk you through the entire process, emphasizing safety and providing the “why” behind each step. This is not just a set of instructions; it’s a foundational skill for automotive self-reliance.
Table of Contents
Why Would You Need to Disconnect a Car Battery?
Before we touch a single tool, it’s important to understand the common reasons for this procedure:
- Safety During Repairs: Any electrical work, from changing spark plugs to replacing a headlight unit, is safer with the battery disconnected. It prevents short circuits and accidental shocks.
- Long-Term Storage: If you’re not driving your car for a month or more, disconnecting the battery prevents it from draining due to passive draws from the clock, security system, or onboard computers.
- Battery Replacement: Obviously, to put a new battery in, the old one must be disconnected and removed.
- Resetting Electronics: In some cases, disconnecting the battery can reset error codes or glitchy infotainment systems (though this should be done with caution, as it may also reset learned values for your engine and transmission).
- Emergency Situations: In the event of an electrical fire or accident, quickly disconnecting the battery can cut power to systems and prevent further danger.
The Golden Rule: Safety First
Working with a car battery involves dealing with high electrical current, corrosive chemicals, and potentially explosive gases. Respecting these hazards is non-negotiable.
What You’ll Need:
- Protective Gear: Safety glasses and chemical-resistant gloves are essential.
- The Right Tools: Typically, a set of socket wrenches with extensions (usually 8mm, 10mm, or 13mm) or an adjustable wrench. A battery terminal puller can be helpful for stubborn, corroded terminals but is not always necessary.
- Baking Soda & Water: A small mix of this can be used to neutralize battery acid corrosion.
- A Wire Brush or Battery Terminal Cleaner: For cleaning the terminals and cable ends.
- A Memory Saver (Optional): This device plugs into your cigarette lighter or OBD-II port to maintain power to your car’s computer and radio presets while the battery is disconnected.
The Step-by-Step Process to Disconnect Your Car Battery
Follow these steps meticulously to ensure a safe and successful disconnection.
Step 1: Preparation and Parking
Park your vehicle on a flat, stable surface away from any ignition sources (like open flames). Ensure the ignition is turned completely off and the key is removed. Engage the parking brake firmly. Pop the hood and secure it with the prop rod.
Step 2: Locate the Battery
For most vehicles, the battery is located in the engine bay. However, some manufacturers place it in the trunk or under the rear seat to optimize weight distribution. Consult your owner’s manual if you cannot find it.
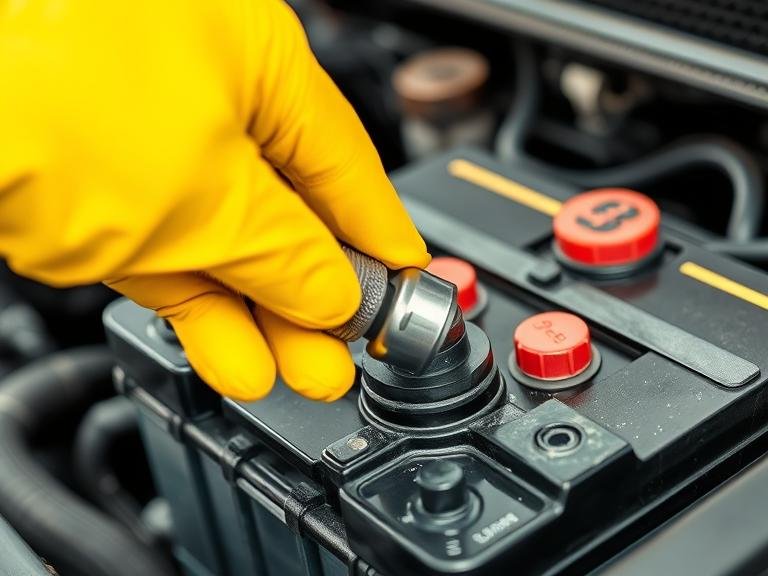
Step 3: Identify the Terminals
You will see two large metal posts, each with a thick cable attached:
- The Negative Terminal: This is marked with a minus sign (–). The cable attached to it is usually black.
- The Positive Terminal: This is marked with a plus sign (+). The cable attached to it is usually red, but may sometimes be another color. It is critically important to identify these correctly.
Step 4: Disconnecting the Terminals (The Correct Order!)
This is the most important part of the entire process. The correct order is designed to eliminate the risk of a dangerous short circuit.
- ALWAYS DISCONNECT THE NEGATIVE TERMINAL FIRST.
- Why? The entire body and chassis of your car is grounded, meaning it’s connected to the negative terminal. By disconnecting the negative cable first, you break the circuit. If your wrench were to accidentally touch any metal part of the car while loosening the negative terminal, nothing would happen—there’s no complete circuit.
- Use your wrench to loosen the nut or bolt that clamps the negative cable onto the terminal. You may need to wiggle the connector gently to free it. Once loose, carefully move the negative cable away from the battery terminal and secure it so it cannot swing back and make contact. Tucking it to the side of the battery bay is often sufficient.
- THEN, DISCONNECT THE POSITIVE TERMINAL.
- With the negative cable disconnected and secured, the circuit is now completely broken. It is now safe to disconnect the positive terminal (red cable). Loosen the clamp and move the positive cable away from the battery.
What if there is corrosion? If you see a white, blue, or greenish crusty substance on the terminals, that’s corrosion. It’s best to clean it with a wire brush and a paste made from baking soda and water after the battery is fully disconnected. Apply the paste, scrub, and rinse with a small amount of water, being careful to avoid getting water into the battery’s vent caps.
Reconnecting the Battery: The Reverse Process
When it’s time to reconnect the battery, you simply reverse the disconnection procedure. This is equally important for safety.
- Inspect and Clean: Ensure the battery terminals and cable connectors are clean and free of corrosion.
- RECONNECT THE POSITIVE TERMINAL FIRST. Slide the positive (red) connector onto the positive battery post and tighten the clamp securely.
- THEN, RECONNECT THE NEGATIVE TERMINAL LAST. Slide the negative (black) connector onto the negative battery post and tighten it securely.
Once reconnected, you may need to reset your clock, radio stations, and power windows (often by rolling them up and down completely). The engine may idle a little roughly for the first few miles as the engine control unit (ECU) relearns its parameters—this is normal.
What to Absolutely Avoid
- Never disconnect the battery while the engine is running. This can cause a massive voltage spike that can destroy alternators, ECUs, and other sensitive electronics.
- Never allow a metal tool to touch both terminals simultaneously. This will create a short circuit, generating extreme heat, sparks, and possibly causing the battery to explode.
- Never disconnect the positive terminal first. As explained, this greatly increases the risk of a short circuit.
- Never work on a battery without safety glasses. Battery acid is highly corrosive and can cause serious eye damage.
Informational FAQs
Q1: Will disconnecting my car battery reset the check engine light?
A: It might, but it is not a guaranteed fix. Disconnecting the battery will clear the temporary “codes” that triggered the light. However, if the underlying problem still exists, the light will come back on after a short drive. Modern cars also store “permanent codes” that are not erased by a battery disconnect.
Q2: How long can I leave my car battery disconnected?
A: A healthy, fully charged battery can typically hold its charge for several weeks when disconnected. For long-term storage (over a month), it’s best to either use a battery maintainer/tender or disconnect it and recharge it every few months to prevent it from discharging completely, which can cause permanent damage.
Q3: I disconnected my battery, and now my radio says “CODE” or is locked. What do I do?
A: Many older and some modern radios have an anti-theft feature that requires a security code after a power loss. You will need to enter this code to reactivate the radio. This code is usually found in your vehicle’s owner’s manual, on a card in your glove box, or sometimes obtained from your dealership with proof of ownership.
Q4: Is it bad to disconnect a car battery?
A: No, the act itself is not bad for the battery or car if done correctly. The minor inconvenience is resetting electronic preferences. The only potential “bad” aspect is if it’s done improperly, leading to the risks outlined above.
Q5: Do I need a memory saver device?
A: A memory saver is not necessary for the disconnection process itself, but it is convenient. It preserves settings like radio presets, seat memory positions, and learned engine parameters. If you don’t have one, you will simply have to reset these features manually after reconnecting the battery.